Wednesday, June 10, 2015

Beyond the Sea Mini Booklet

Oh boy!! Have I found the cutest item ever for making a quick and cute Mini Booklet!! Ya know those ID Badge Holders, the ones you can wear around your neck or attach with a clip? Well guess what!!! They make FUNtastic pages in a mini booklet!!!

I created this for my Granddaughter who has been vacationing at the beach this past week. I thought she might like to print out some of the pics she took and just add them to this cutie. The pocket part of these wonderful ID Badge Holders makes it so simple to add a picture front and back.


I could have made a cover for this mini album, but thought the ID Badge Holders stood fine on their own. Just slip some designer paper in and, whala - instant cover!!! So that's what I did. I used CTMH Seaside Designer Papers for the inserts in all the ID Badge Holders I used. I also "altered" those little Badges, cuz ya know, that's what I like to do also.


One this first page, which is the cover, I added press on sparkly letters to say "Beyond the Sea" right to the outside of the larger ID Badge. If she wants to slip a picture on this side of the Designer Paper she can, and the Title will still show.

I used a smaller ID Badge Holder for page two.


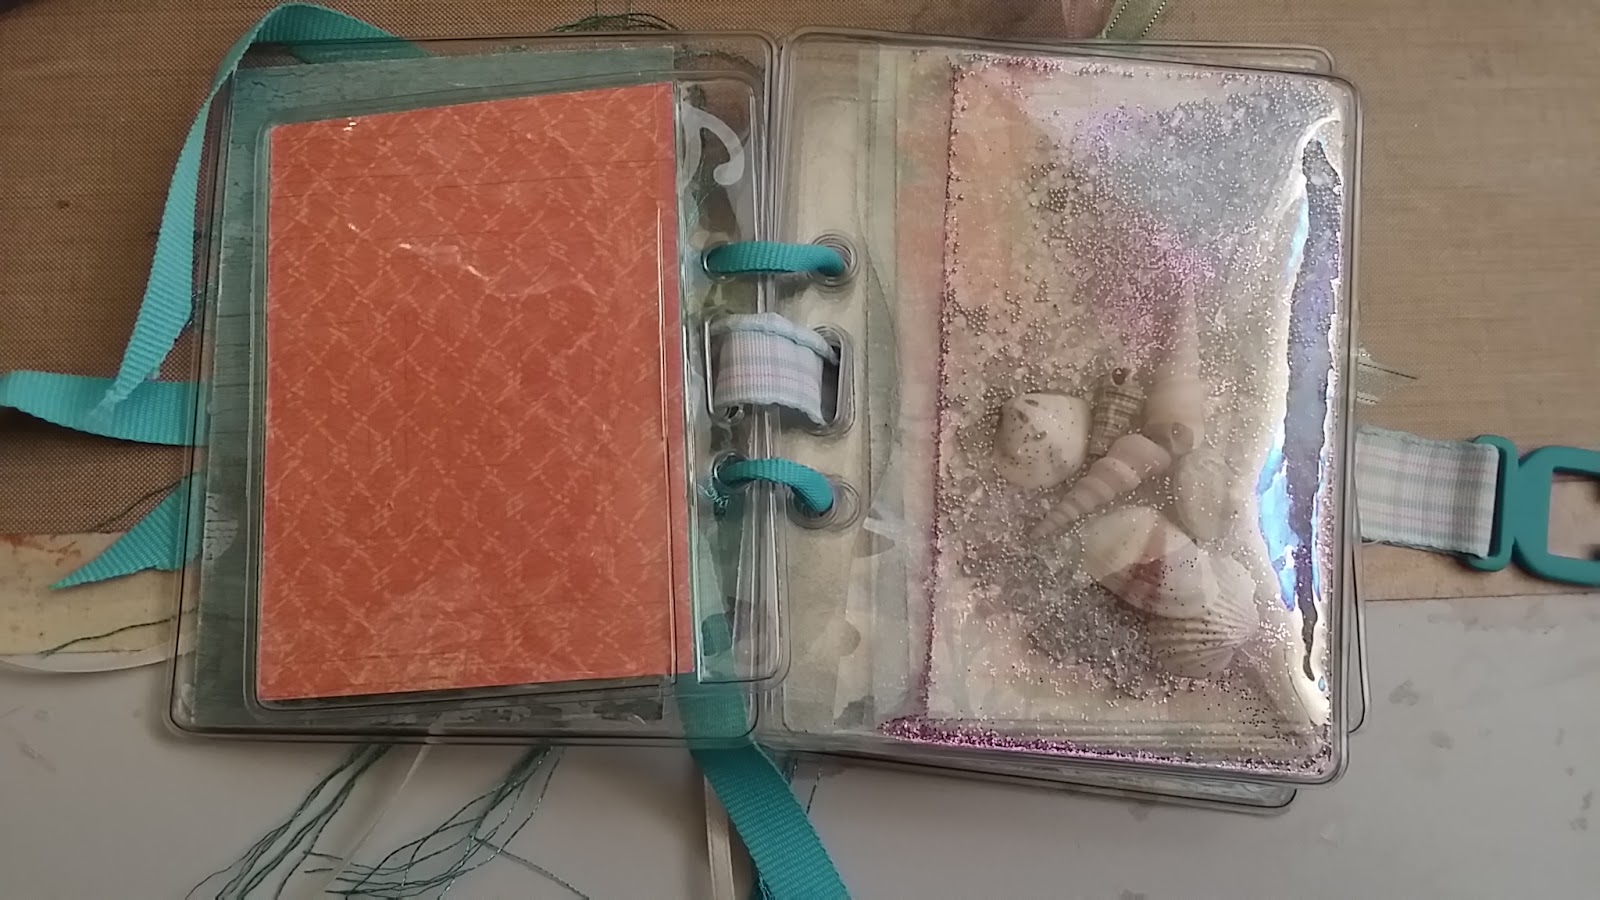
I thought it would be such a cute idea to add some glitter, glass beads and glass glitter along with some tiny sea shells for a shaker for page 3 using the larger ID Badge. I think it is the most adorable ever!!!


For page 4, I used the larger ID Badge Holder and slit it down the middle to form "doors" to open. She can add thumb print pictures to the Designer Paper glued into place on the front, as well as adding them to inside of each door. In the inside, she can add one or several pictures as she likes. Since I had to glue this paper into place, she can't slip a picture on the back side, so I used Rub-Ons to add some Beachy words to the outside of the backside of the Badge. I love how this looks!!!


Page 5 is a smaller ID Badge Holder that she can use both front and backsides on.


Page 6 is my favorite. I slit the larger ID Badge holder on an angle to create a pocket. I glued some of the CTMH Designer paper onto the slit front and in the inside. Then I added a double tag for more pictures in the pocket I created.


And once again, since she can't add a picture to the back side I used more Run-Ons to decorate. I just love that saying!!!

Page 7 is another smaller ID Badge Holder


Page 8 is the back cover. I used the larger ID Badge Holder and just left it plain so she can add whatever pictures she likes.


Now to assemble this... I love using ribbons on booklets and thought since these ID Badge Holders come with holes to add a chain, I would use them to thread the ribbon thru. This also allows my granddaughter the advantage of spreading the pages apart as she adds stuff. All she has to do is untie the ribbon and make it looser.


Now to close it, I had these adorable little clasps. So I strung a matching ribbon thru the slot where a lanyard would go, taping the edges down to hold the clasp. I love how this all co-ordinates with the colors of the sea. I just added some more ribbons and embroidery thread, cuz who doesn't like lots of pretty ribbons!!!


I also made a quick little video you can watch HERE to see the ID Badges Pages up close and see the interactive parts.


I hope you like this cute idea of using ID Badge Holders. Think of the possibilities!!  A New born Baby Booklet with holders for a lock of hair, the first tooth, their name bracelet...  A Christmas Mini Booklet that can be used year after year, just add new pics, keeping the old. A friendship booklet... Booklet of tiny keepsakes...

Please visit their website, by clicking HERE, to see all the great sizes and shapes of these little gems.


Supply List:

ID Badges:
     #1815-1200 measure 4 1/2 inches x 3 1/2 inches
     #1820-1000 measures 3 3/4 inches x 3 inches
CTMH Seaside Paper Pack
Making Memories Cheeky Shimmer Stickers
Making Memories Woven Ribbons and Attachments
My Minds Eye RubOns
Beach Sentiment RubOns
Finnabair Glass Glitter Pearl
Finnabair Glass Beads Crystal
Finnabair Micro Beads Silver
Finnabair Glitter Mardi Gras
Sea Shells

Thank you for visiting my blog.


Saturday, May 23, 2015

Wearing "Art"...

Spark Some Kreativity Saturday @ The Kraaft Shaak

This month's Challenge for the Design Team Members at the Kraaft Shaak is to make something wearable from items in the Multi-Media Kits supplied by Heather. Boy did I have fun with this one!! I couldn't stop, so I made two!! That MultiMedia Kit is just chocked full of items to use!!!  #KSDT2015


I've spoken about this Kit, and have made a video showing all the wonders found inside the kraafty box, and boy, is it packed full of goodness, especially to me, a quasi-jewelry maker. When this challenge was announced, I was just too eager to begin, cuz I knew exactly what I wanted to make -- a bracelet!!!  I just love how it turned out, and  it truly is wearable "Art"...

Here's some pictures of Wearable Art #1:


And if you are interested in how I made this, please watch this video  (On my YouTube Channel) it shows all the steps I went thru to make this pretty, pretty item...

Or view it here below:


Supplies:
Kraaft Shaak Multi-Media Kit:
     Finnabair Mechanicals
     Metal Findings
Vintaj Natural Bass Wire 16 gauge
Various Jewelry Making  and Wire Tools
Swarovski Crystal Beads


And this is Wearable Art #2:


This MultiMedia Kit contains such wonderful items that I just had to make another wearable!! This time I made a T-Shirt Bag!! They are sooooo easy and sooo cute and a great way to recycle an old t-shirt. And anyone who knows me, knows I love to recycle/repurpose items!!!

In the Kit was a Finnabair 6x6 Stencil Doily #3 which I knew would make a wonderful pattern on the t-shirt. I used Permaset Copper Metallic Textile Printing Ink to dab onto the stencil. This ink is permanent when heat set. The Kit also contains sample of various products from the Kraaft Shaak and I used the Lindy's Stamp Gang Magicals to dye the cheesecloth and dryer sheet included in the Kit to make the yummy flower. I also used the round plastic needle point canvas included, to stamp even more patterns onto the shirt.

Our model shows one of the many uses for this generous bag -- pool time!!! Holds several pool towels, your swim suits, sun screen, hats...


If you are interested in how I made this cute bag, and I sincerely hope you are, click HERE or visit my YouTube Channel "taboriginal"

Or just watch the video below:


Supplies:
Kraaft Shaak Multi-Media Kit:
     Finnabair 6x6 Stencil Doily #3
     Lindy's Stamp Gang Magicals
     Cheesecloth
     Dryer Sheet
     Round Needle Point Plastic Canvas
Permaset Copper Metallic Textile Printing Ink
Pebeo Artist Acrylic Paint Quinacridone Pink
Old white T-Shirt

Thank you for visiting my Blog and hopefully watching the videos. I would love to read your comments!!!

Have a great Day and "Spark that Kreativity" today, it's Saturday!!!


Saturday, May 2, 2015

Tickle me with a "Spark"...

Spark Your Kreativity @ The Kraaft Shaak

WOW the only word I can find to describe what Sandra made this month for the Design Team Challenge in the Kraaft Shaak. Sandra always amazes me how she "thinks outside the box" and boy, did she ever on this one!

We are tasked this month to make something wearable from items in the Multi-Media Box from the Kraaft Shaak. Take a look at what Sandra did by clicking HERE for the link to her blog...

#KSDT


Saturday, April 25, 2015

Dana's Spark will Spark you!!!

Oh boy, have I got a treat for you!!! Over in the Kraafters Kommunity on Google+, Heather has assembled a Design Team. Every Saturday there is a new post to "Spark your Kreativity" and did Dana S ever spark it today!!! Please visit her blog HERE to see the gorgeous "Book" she made using many of the items found in the Multi-Media Kit from the Kraaft Shaak.


Saturday, April 18, 2015

A "tray"rific Spark of Keativity

Over in the Kraffters Kommunity on Google+, Heather has gathered a Design Team, the very First ever Design Team which consists of Sandra, Dana, Shel and myself. Each Saturday for the Month of April,  a DT Member posts an altered item from the Kraaft Shaak Multi-Media Kit they received. First up for April was Sandra, the Team Leader who made this adorable "Bank", I was next with this altered Note Holder and today is Shel's turn with this incredible "Spark of A Kreativity" -- this awesome altered tray. Please visit her blog to see how she made this and see all the wonderful steps and supplies used.


Please visit all the highlighted links above for the Kraaft Shaak, the Design Team, and the Weekly Sparks of Kreativity

Thank you visiting!!!

Saturday, April 11, 2015

SomeBunny Loves You...

Spark Some Kreativity Saturday @The Kraaft Shaak

A new Dawning, a New Beginning - that is the essence of SpringTime AND a whole new project happening at the Kraaft Shaak. Every Saturday, starting with April 4th, one of the Members of the newly formed Design Team, will be posting a unique project loaded with ideas to “Spark your Kreativity”.  Sandra started us off with a great idea to Inspire and/or Motivate your artistic mojo. Visit her blog here to see the beautiful “Bank” she kreated.

And now, it’s my turn…  and I have a Tale to spin to begin my project called … 

SomeBunny Loves You…

Lots of Kiddies and many adults too, don’t know the “Other” tale of the Easter Bunny, and I might add it’s a very symbolic tale at that!!! You see, when all the kiddos from all the Lands have gathered all the Easter Eggs from all the meadows, and fields and deserts, and the whole Easter Egg celebration is through, this Little Guy, some call Peter, but I call him SomeBunny, hops around collecting the unfound, leftover Eggs, to take back to his rabbit hole for his tiny Little Ones, who are way too small right now to venture out from their Home. SomeBunny keeps collecting until his little Rabbit Hole is filled, and along the way, he also stops to gather some of the Beautiful Flowers starting to bloom all over the world, because it is Spring and that’s what happens in Springtime!!

And to commemorate this wondrous Season, I have altered a Kraft Box I received in the Multi-Media Kit from the Kraaft Shaak. Heather has packed this Kit FULL of goodies, but aside from that, what is truly unique with her Multi-Media kit, is -- you can choose from two additional unique items - a paste sample and a paint sample. How kool is that!!!??

I have made a series of quick videos showing each step along the way. It was great fun kreating with all the goodies I found inside my Multi-Media Kit and other items found at the Kraaft Shaak

Journey along with me as we watch SomeBunny’s Rabbit Hole grow with eggs, and flowers and magical ideas…


First up is the Kraft Box and I did a quick little Spark Of Kreativity here with the contents of this Kraaft Box, a bonus altered item….


Now, wasn’t that fun!! And so easy to do and best of all, you can use all those leftover Designer Papers to make these little gems.

But, lets get onto the making of the Rabbit Hole …

First up — The Earth. I used some of the paper pages included in the Multi-Media Kit to make paper pulp, which I then painted with acrylic paint and embellished, as a proper rabbit Earth mound should be… watch this quick video for all the steps used here…


Now, since it is Springtime, and it IS the Season of Rebirth, Anew, Fresh Beginnings, we often celebrate this with the Egg, the symbol of ReBirth. And tales abound as to how the Bunny came to be the guardian of this Hunt, but as children, we can recall our favorite Easter Egg Hunts and Good Ol’ Peter Rabbit right there with us. But before any Hunt begins, we must have eggs, lots of eggs which must be decorated to be sure to catch that Bunny’s eye!! For my eggs, I used the Cricut Expressions to cut various sizes, colored them with Shaving Creme Marbling using Prima Color Bloom Sprays in Peony, Teal and Gold. Watch this video for the complete process…


Wasn’t that fun!!! Now we also need the Easter Bunny, who will gather all those eggs. Watch here to see how he takes shape…


Isn’t that Finnabair Platinum Crackling Paste yummy? The shimmer of the off-white creamy color adds just the right amount of pearl essence to any project. And when left to air dry, these wonderful cracks appear. You can heat dry also for finer, less obvious crackle.

And everyone knows that SomeBunny needs a trail to go hoppin down, right? It’s generally called, The Bunny Trail -- hear that tune now playing in your head?? Watch here to see how I created one using Finnabair ArtIngredients Copper Glass Glitter and 3D Gloss Gel... it’s sooooo textured and full of sparkly goodness!!!


The next video shows the completed Altered Kraft NoteBox. I recorded a video, or thought I did, showing the process I used to kreate the Popups, but it didn't record. So, I'll just have to explain the steps here:  For the inside popups, I used packing plastic found on many items today. I just cut-to-fit to the bottom of the box, glued in place with hot glue, folded up two sides, cut them into strips and added the eggs, flowers, etc by gluing in place. I just love popups and thought this would be a grand idea to incorporate into this little note box, bringing to life the unexpected, just like Springtime does.  I added other embellishments and Three Crosses to honor The Sacrifice made for ME on that Mound, eons ago.

The sentiment honors everything about the Spring Season to me... my Faith, faith in the excitement of New Beginnings, faith in the continuing Cycle of Life, and my Belief that no matter what your Faith, or definition of Faith, if you walk with an Moral Code, Your Faith Shines Bright…

The whole story here of SomeBunny, is symbolic of Christ, going forth into the World, saving/rescuing/ministering to the unwanted, the left behind, the unfound. He gathers them all, brings them Home into His Fold, provides shelter, supplies their needs all through Faith, Hope and Love...  SomeBunny indeed loves you!!!


Thank you for visiting my Blog. I am truly Blessed to be a part of the Design Team for The Kraaft Shaak, comprised of myself and there other extremely talented ladies:

Sandra - who heads up the Team, You can visit here blog here and also the very first ever Kreative Spark designed for the Kraaft Shaak here

Shel - you can visit her blog here. Look for here Kreative Spark post on April 18

And Dana - her Blog can be found here, and her first Kreative Spark post will be on April 25th

You can also visit the Kraaft Shaak Design Team Page here where you can find more information on all the Design Team Members

Products used that can be found at the Kraaft Shaak:
#KSDT2015

And if you are interested in the complete contents of the Multi-Media Kit I received from the Kraaft Shaak, you can view the Open The Box video here.


Yummy goodness there!!! Thanks for watching all these videos and for joining me on this Kreative Spark, and be sure to watch for more Sparks every Saturday from the KraaftShaak Designers

Blessings...

PS... all colored Text are links to the products used


Sunday, April 5, 2015

New beginnings...

The true definition of Spring -- which symbolizes new beginnings to me. We also are seeing New Beginnings at the Kraaft Shaak. -- Heather has assembled a Design Team. The first such adventure for her and the Kraaft Shaak. It is a New Beginning for sure.

And what better way to Begin, than to have the Leader of the Design Team, Sandra ArtfullyMade , post an Inspirational and Motivational Altered Project, a "Bank". A depository of ideas, of quotes,  techniques -- little "Sparks of Keativity" to hold your inner critic at bay, to inspire you, to motivate you. Put the "Good" in and when the "bad" starts a-calling, pull out a "Spark of Kreativity" and lift yourself up!!!

Please visit Sandra ArtfullyMade to see just how she kreated this gem on her BLOG post or on the Kraaft Shaak Design Team Page. You're gonna love it!!!

#KSDT2015